HTTP to HTTPS Migration Guide for WordPress on WPEngine
Last updated: 2017-02-26
I have migrated over a dozen websites to HTTPS in the last months. As expected, no one traffic skyrocketed. On the other end, no one had a noticeable drop in traffic.
I still do recommend the HTTPS move for most sites. So I thought I’d document my process into a guide if it can help the ones who want to switch to HTTPS themselves.
Disclaimer: These steps cover what most WPEngine (and similar hosts) users need to do to move their WordPress site to HTTPS safely, but every site is unique and may require steps not included here. If you have questions regarding your site, feel free to leave a comment.
Looking to get your WordPress site moved to HTTPS by an expert? Please see my HTTPS migration services or contact me directly.
So here we go…
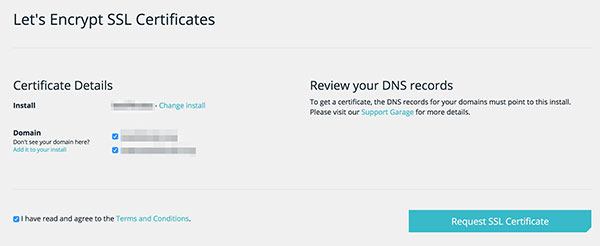
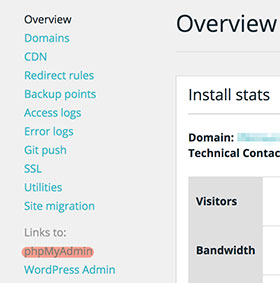
1. Install SSL Certificates
Open the WPEngine install and go to “SSL” on the left hand side menu. Select both subdomains (www and non-www) under Let’s Encrypt SSL Certificates and click “Request SSL Certificate”.
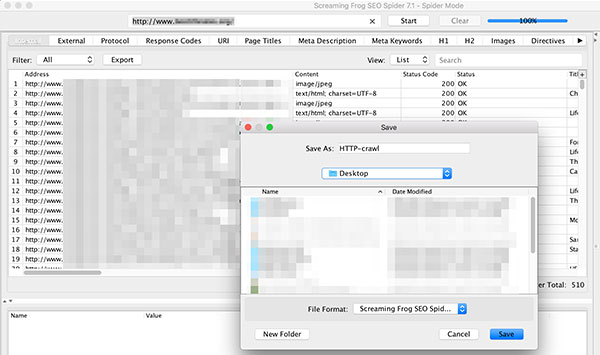
2. Crawl and Save HTTP URLs
Fire up Screaming Frog and crawl your entire site. Save file as HTTP-crawl.seospider.
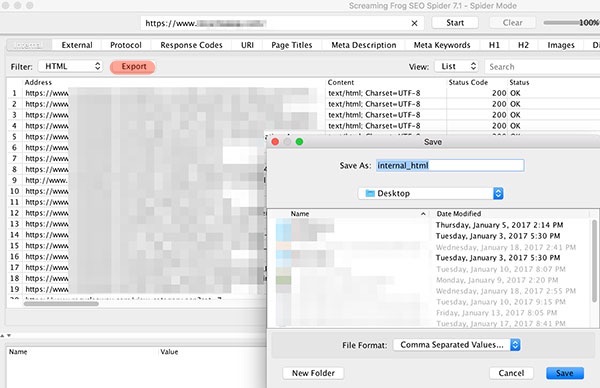
Then export all URLs from your crawl:
Then save a copy of your XML sitemap(s).
You should now have 3 files:
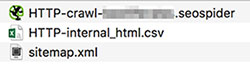
Keep these close, you’ll need them later.
3. Create a Backup
Before going forward, create a backup in WPEngine admin under “Backup Points”.

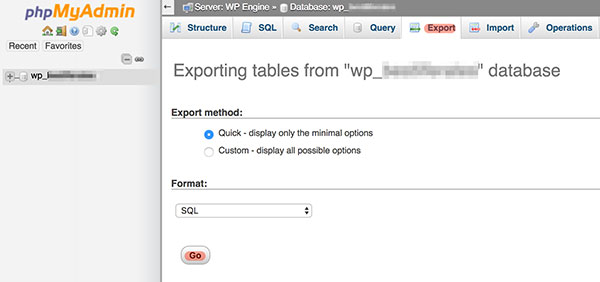
4. Update MySQL Database Links
Open phpMyAdmin via the WPEngine install menu:
Select your database and export:
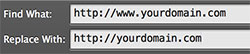
Then open the database with TextWrangler (or your favorite text editor) and mass replace (cmd+F) your domain name to the https version. If you use www it should like this:
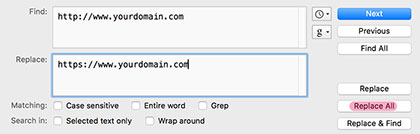
Replace http://yourdomain.com and http://www.yourdomain.com to https://www.yourdomain.com (or https://yourdomain.com, whichever one you use).
Save it, rename the file to new-mysql.sql and upload it to your /wp-content/ folder via FTP.
5. Configure SSL / HTTPS
Under SSL in WPEngine admin, set the following configurations:

6. Import new MySQL Database
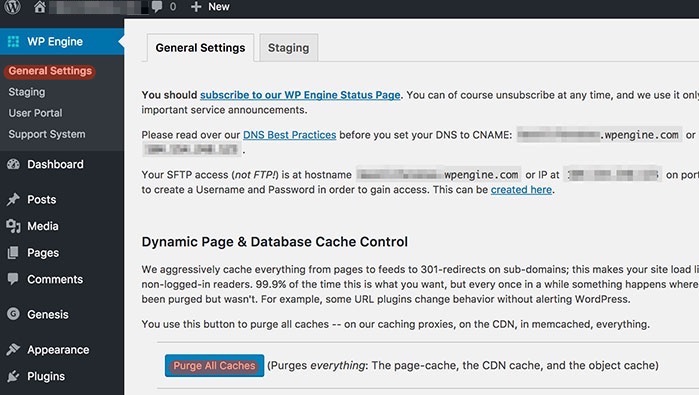
Go to WPEngine chat support and ask them to import the updated Mysql database. Once they confirm it's done, keep the chat open.
Go in WPEngine General Settings in WP and “Purge All Caches”.
Then clear your browser cache and check if the site is working properly.
If it’s not ask WPEngine support to revert back or restore yourself using your previous backup via the admin panel.
If it crashed the site (which can happen for unknown reasons) you can skip the above and do the following instead.
6.1 You can just ask WPEngine support to mass replace http://yourdomain.com and http://www.yourdomain.com to https://www.yourdomain.com (or https://yourdomain.com, whichever one you use).
Or last resort…
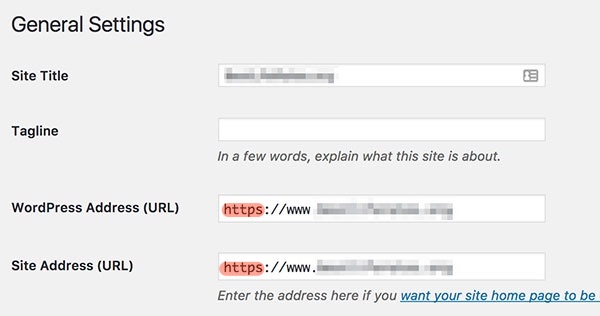
6.2 Go to WordPress admin under Settings > General and update both URLs to HTTPS and “Save Changes”.
Then you can update your internal links to HTTPS with the help of this plugin.
7. Test 301 Redirects
To test redirects, open HTTP-internal-html.csv and copy all URLs under the "Address" row. Paste in TextWrangler and mass replace (cmd+F) the URLs without www (or invert) to test redirects with and without “www”.
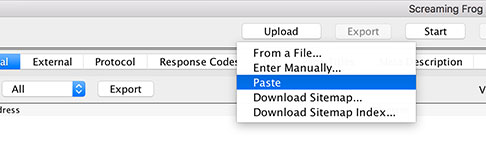
Open Screaming Frog, change the Mode to “List” and paste all www and non-www HTTP URLs.
Make sure they all 301 to the HTTPS version.
8. Crawl HTTPS URLs & Fix Insecure URLs
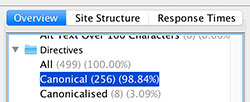
Start a fresh crawl in Screaming Frog. Once done, make sure your canonical URLs are updated.
Export the Insecure Content Report:
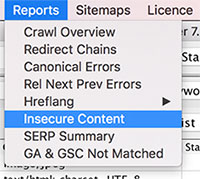
In the report, you’ll find the pages containing insecure URLs under “Source” and the related insecure URLs under “Destination”.
You’ll want to fix all these to render the whole page in HTTPS.
The quickest way to do this is to download the wp-content directory via FTP and use Sublime Text (cmd+shift+F) to search insecure links in all files in wp-content directory. Go through all insecure links, save file and then reupload the files or entire directory.
You can also use Google Inspect and the "Fetch As Google" tool (in Webmaster Tools) to help spot and fix insecure links.
Then clear your browser cache, purge all caches in WordPress admin (see #6) and flush DNS cache.
Finally, run a new crawl to make sure insecure links are all cleared up.
9. Add HTTPS Properties to Webmaster Tools
Add and verify https://yourdomain.com and https://www.yourdomain.com.

If you don’t already have http://yourdomain.com and http://www.yourdomain.com in GWT properties, add them too.
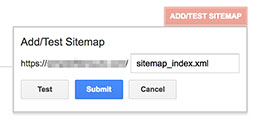
10. Submit HTTPS XML Sitemap
Make sure your XML sitemap URLs are now HTTPS (you might have to regenerate it). Then Save a copy and crawl with Screaming Frog to make sure all URLs return a 200 status code.
In your Webmaster Tools main HTTPS property, submit your sitemap under Crawl > Sitemaps:
11. Update Google Analytics to HTTPS
In Google Analytics, go to Admin > Property Settings and set the default URL to HTTPS.
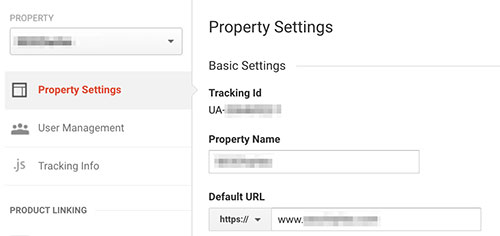
Then go to Admin > View Settings and do the same thing.
On the same page you can also “Adjust Search Console” to your new Webmaster Tools property.
12. Update robots.txt Sitemap Link
Update your robots.txt sitemap link to HTTPS.
![]()
13. Update External Links
Update your social profiles links to HTTPS (Twitter, LinkedIn, Facebook, etc.) and websites you have control over. It's also recommended to get a few external backlinks updated if possible.
14. Upload HTTP Sitemap
Via FTP, create a /http-xml/ folder in your root directory and upload your HTTP sitemap you saved earlier. In Webmaster Tools go in your main HTTP property under Crawl > Sitemap and delete the existing XML sitemap.
Then Submit the new one /http-xml/sitemap.xml. This will help accelerate reindexing.
15. Reupload Disavow File
If you had a disavow file submited under your HTTP properties. Reupload to both www and non-www HTTPS properties.
16. Monitor Reindexing and traffic
In the following days and weeks you’ll want to make sure the reindexation goes well by monitoring indexation and organic traffic.
Data should also start appearing in your Webmaster Tools HTTPS property within a few days.
Commands I use to monitor indexation in Google:
- site:yourdomain.com
- site:yourdomain.com inurl:https
- site:yourdomain.com -inurl:https
That's it, hope this helps! If you have any question or comment, leave it below.
Hi Charles, nice tutorial, as always, well written and contains a lot of screenshot (not video) to explain step by step process.
There’s one thing that is missing from this doc that you could update.
I generally use certbot over ssh access to match apache or nginx server, for the majority of websites DNS also have a www CNAME record that point to the domain.
A certificate with let’s encrypt should be also asked for that www record to not face untrusted certificate in the bar or even worst, getting a page on google chrome that say that certificate is invalid and require more user action.
https://certbot.eff.org/
For PCI compliance this should be put in place 🙂
Thanks again for this nice tutorial.
Hey Julien, thanks for the good words and advice!
In that context WPEngine takes care of the SSL install, it’s probably what they are using. But I actually used Certbot for the SSL install on this site.
Cheers my friend,
Charles
Hi Charles, thank you for this! One question – is step 14 (Upload HTTP Sitemap) necessary? I’ve been looking around to compare best practices from a few different sources before migrating and didn’t see this recommended elsewhere. Thanks for your time!
Hi Jonathan, pleasure! No it’s not necessary to upload the HTTP sitemaps. I do it to get spiders to go through 301 redirects (and index HTTPS pages) faster.
Sounds good, thank you!
Why WP Engine so difficult for config!
Anyway have some plugin can help it for mine: wordpress.org/plugi…
but I still must do the database search,,, thanks
Hi Charles, thank you for this great tutorial. I was looking for an article concerning https migration on WPEngine specifically.
I would like to ask you a question on #7 where you suggest how to test 301 redirects. Although it is so important for SEO to setup a global 301 redirect (#4 of John Mueller’s: https://plus.google.com/+Jo… ), I haven’t seen how WPEngine explicitly sets this redirect. Upon contacting their support I got this answer:
“Nobody needs to write a 301 redirect for this task. The 301 redirect is a result in this situation, not a specific coding instruction. When you enable “secure all urls” in the user portal a rule similar to the following, is added to the nginx configuration:
html {
server {
listen 443;
server_name signup.example.com;
ssl on;
ssl_certificate /path/to/my/cert;
ssl_certificate_key /path/to/my/key;
ssl_session_timeout 30m;
location / {
root /path/to/my/rails/app/public;
index index.html;
passenger_enabled on;
}
}
}”
On the other hand, according to https://www.nginx.com/blog/… the proper code should include:
server { listen 80; server_name domain.com http://www.domain.com; return 301 https://domain.com$request_uri; }
The above is applied by Kinsta for example.
I would be grateful if you could let me have your thoughts!
Hi Michael, thanks for the good words! There are different ways to get the 301 redirect rules working. Personally I don’t care much about what code is used as long as the 301 redirects work.
The only thing that is not ideal with WPEngine settings is a redirect chain for the non canonical URLs. For example, if your canonical URL is https://yourdomain.com, http://yourdomain.com will redirect to http://www.yourdomain.com, then https://www.yourdomain.com. Ideally it would redirect directly to destination, but I let this one go with WPEngine. Hope this helps!
Hi guys, another thing that isn’t ideal with WPEngine’s default setup is that, if you test, likely only your page urls are redirecting to https. Static asset urls are likely still resolving at http. This isn’t ideal as you likely have links to many of those assets already. I’ve been working with WPEngine for the last number of days and they were able to add a custom config to my ngix setup to ensure that static assets are also redirected. They should have this documented now so go ahead and ask them!
Hi Jonathan, thanks for the hint. Do you know what exactly was that custom config to your ngix setup which ensures that static assets are also redirected? If I have to ask such thing to the support I would better say what exactly I need!
Hi Michael, I’m sorry I’m not sure what they did exactly, but they should have this documented now. Just ask chat support if they can also set a redirect for all static assets to https – if they don’t know what to do ask them to escalate a ticket to Tier II support who should be able to implement this for you.
That’s a good idea, thank you Jonathan!
No problem, good luck!
Hi Charles, I just found out that there is a way to avoid the double hop you describe here. The redirect from domain.com to http://www.domain.com needs to be removed from the “Domains” section of the wpengine dashboard, and then a new redirect rule would be put in place in the “Redirect rules” section that would redirect all domain.com traffic to https://www.domain.com. With this fix and the fix I describe elsewhere in these comments re redirecting static assets, that should ensure an optimal setup on WPEngine post https migration.
There is one last item I’m trying to figure out though – even once the static asset redirects are put in place by support, robots.txt is still resolving at both http and https for some reason. All other static assets redirect to https but robots.txt bypasses this rule somehow. Support has told me that they can work on getting this redirected also if I’d like but I’m trying to decide what is best first and am not finding a lot of information on it elsewhere on the web.
Would you say that it’s ideal to have http://www.domain.com/robot… redirect to https://www.domain.com/robo…, best to leave as is resolving at both, or that it’s a non-issue either way? Thanks for your thoughts!
Hey Charles, thank you for your reply. You are right, the 301 redirects work but there is a two-step redirect for the http non-primary domain. Just as you said it redirects first to the http primary domain and then http primary domain redirects to the https primary domain. This seems to happen if in the WPEngine’s user portal > Domains you have set a redirect from the non-primary domain to the primary domain (protocol agnostic). In https://sailingheaven.com/ I had a redirect from the www to the non-www. The solution here was to remove this domain level redirect in the “Domains” section and add a rule in the “Redirect rules” section where
Domain: http://www.thesite.com
Source: ^/(.*)
Destination: https://thesite.com/$1
Actually, Charles, I see that your images are redirecting to https. Did you need to go through this with support and have them config for you also outside of their default setup?
Hey Jonathan, this site is generated with Middleman and hosted on DigitalOcean so I did the config myself.
Oh ok, makes sense – to the best of my knowledge it isn’t something WPEngine ever has setup by default so I was curious. Thank you!